1. Connect to Your Shopify Store
Set up a new store
2. Setup Webstore Settings
Once you have granted the permission in Shopify, Go back into Versa and make sure you are on the web store listing page. (Tools Menu, Web Stores). You will see your web store listed. Click on setting to set up the setting for the integration. This will control how Versa access your store.
The setting page is divided into a few sections.
Settings for orders
Synchronize product images: Check if you want to synchronize the images of products in Versa with Shopify store. Versa will download the images and also update images to your store when publishing new products.
Import Open Orders Only: Only import order that is not fulfilled in Shopify.
Default facility to fulfill orders from: All the web orders would be downloaded and associated with the chosen facility. (Facility = Location in Shopify). If you use multiple locations, the system will use the location to facility mapping instead.
Put imported orders under this order channel: (optional) Versa has a concept of Sales Channel (Setup Menu, Sales Channels) You can link new orders and invoices to a sales order channel so that you can easily identify web store orders.
Link orders with no customer details to: It is possible for a Shopify order to have no customer information (POS order for example). In Versa, every order must be associated with a customer. You should create a customer (for example, call it web customer) and then choose it to be used to link to orders with no customer details.
The service for shipping/freight on imported orders: Shopify orders have shipping charges. Such charge is created as an additional order line linked to a service. Choose the service to use here. Create a new service if needed (from Products menu, New Service)
Consolidate Sales Tax Into One Tax:(optional) It is possible for a sales order to have multiple taxes. If you do not care about the detail of the taxes, you can choose to store the taxes against one tax in Versa. But the tax rate in the Versa must match the total of all the rates of the sales taxes being combined.
Automatically create invoice for orders that are fulfilled: If an order is fulfilled, Versa can create an invoice using the quantity that is fulfilled. Note: If you have existing orders in Shopify before installing Versa to your store, activating this setting will import all fulfilled orders in your store.
Match taxes by name: When checked, sales tax will be match by name as present in Shopify. Otherwise, the rate is used to match the tax
Settings for products
Match Product by: When an order is imported from Shopify, we need to determine if the product being ordered is in Versa. We can use either the Part number of product (preferred) or using a Sku product identifier which is something you have to specifically loaded from Product Identifier Import in Getting Started. We use the Sku field of a product variant in Shopify to search for the same product in Versa. We recommend you use Part Number.
Skip price updates: Versa will push the prices of products to Shopify unless this setting is turned on. Price update happens once a day. If it is off, you manage the price of products in Shopify.
Skip inventory updates: Versa will push the inventory of products in Versa to Shopify. Turn this on if you do not want inventory be updated in Shopify. Inventory update happens once a day.
Use product collection to match facility?: This setting allow you to specify certain collections in Shopify to be stocked by different facilities in Versa. Turn this on and you can enter the collections to match products to. It is recommended you do not use this unless absolutely needed.
Settings for dimensions (optional)
Settings for inventory adjustments
Versa will import returns in Shopify and if a return has quantity being restocked, then Versa will adjust inventory to record the return. You need to provide the setting per Facility (Facilty = Location in Shopify)
Balancing account for inventory adjustments: The GL account to use to offset the increase/decrease in inventory value. This is generally an Expense account. Go to General Ledger, Charts of Accounts if you want to create a new account.
Inventory Adjustment Reason: The default inventory adjustment reason to use for adjustments. This can be created in Products Menu, Variance Reasons)
Settings for refunds
When importing refunds in Shopify, Versa needs to know which account to return the expense and which asset account to refund the money from. Specify both accounts here. If you want to record the refund expense in accounts receivable, turn it on.
Settings for custom fields (optional)
These custom fields are used for recording additional Shopify information in Versa. This is for advanced users only. Custom fields is a feature in Versa that allow you to attach additional attributes to different data types.
Get Product name from custom field: You can store the long product name in Shopify from a custom field defined in Versa.
Get Product price from custom field: Product/variant price in Shopify can be linked to a custom field in Versa.
Get Product long description from custom field: You can store the long product description in Shopify from a custom field defined in Versa.
Group products by custom field (enter product custom field name): Shopify has products which then have variants under it. Each variant in Shopify would map to a product in Versa. If you want to link the different products (variants in Shopify) together to a Shopify product, define a new custom field for product and use it to store the Shopify product name, also make sure each product (that maps to a Shopify variant) has the same value in this custom field.
Product Vendor Name (enter product custom field name to link to): Store the vendor name for a variant in Shopify in a product custom field.
Product Barcode Field (enter product custom field name to link to): Store the barcode for a variant in Shopify in a product custom field.
Shopify product have variant options (like color or size). You can store the option names for option 1 to option 3 in 3 custom fields. Specify the custom fields in Product variant option custom field name 1(enter product custom field name), Product variant option custom field name 2(enter product custom field name), Product variant option custom field name 3(enter product custom field name).
Once the settings are completed, you should press the Save button. The system will check if all the required settings are provided.
3. Load Your Products From Shopify
This is only needed if you do not already have products loaded in Versa
Next step is download data from your store. After the webstore setting is saved, you would have the chance to import product, pricing and inventory levels from your Shopify store into Versa.
Import Products From Shopify
Versa can import all the products in your existing store automatically. Product category will be created based on the collection set up in Shopify.
If you do not want Versa to import the products for you, another way is to load the products through an CSV import (from Tools menu, Imports and Exports, Parts, Products and Services). See here for details. This might be useful if you have additional products to load and they are not in Shopify store.
4. Loading Other Data
If you have additional products to load and they are not on Shopify, you can use the import capability in Versa to import additional products. See this article about how to do it.
or you can create the necessary records manually.
If you are coming from an accounting system, you can import your chart of account and trial balances as well. See support article about chart of account import and trial balance import.
See what else you can import here.
5. Daily Operations
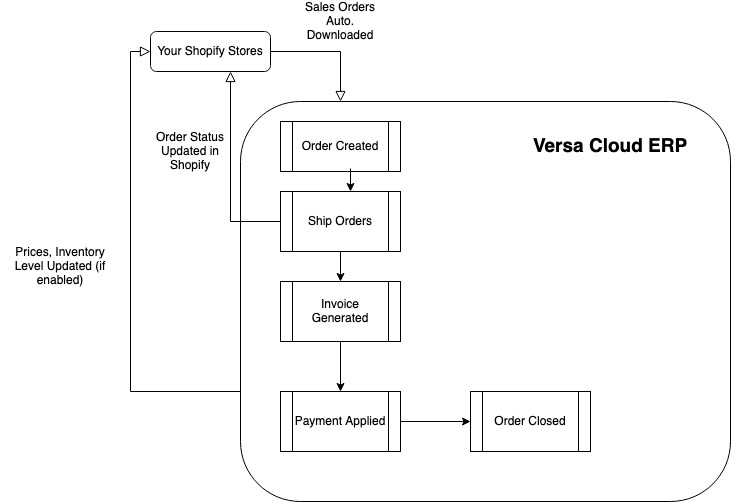
Once the Shopify store is setup, Versa will download your orders automatically on a regular interval. (every 2 hours). Shopify orders will appear as sales order (see Order menu, Sales Orders, Open Orders). When an order is shipped in Versa, the Shopify order will be marked as fulfilled.
See this diagram about how the information flows.
Matching Products In Both Systems
Using the setting specified in Match Product by, Versa can intelligently link products in Versa to products in Shopify during synchronization. If you want to manually force a matching right away, on the Webstore listing page, click on the actions next to the webstore, Link Products to perform such action. This can take some times so let it run and check to log to see if this finishes. Check the log to see if the linking finishes.
Pricing and Inventory Level Updates
Once the products are linked, Versa will then be able to push price updates and inventory changes to Shopify regularly (Once day in early morning) Both can be turned off in webstore setting. The link to update inventory and price is for when you want to manually force the system to perform the updates instead of waiting for the scheduled daily task to run. Orders are imported multiple times in the day. You can also force an order import by clicking on the Import Orders link.
Viewing Shopify Synchronization Logs
The logs link is for you view any webstore related log. The importing of orders, update or prices and inventory levels would appear in the log.
6. Other Tasks
Versa can do much more than just manage your sales order. Review our getting started guide to explore other areas of the application.
Comments and Suggestions
0 comments
Please sign in to leave a comment.
Related articles